

Open-concept living looks fabulous sur Pinterest: wide open spaces, light pouring in, everyone “together”. In real life, it often ends en bazar visuel, cuisine qui déborde dans le salon, coin télé collé à la table de devoirs… et zéro intimité.
The real challenge isn’t knocking walls down. It’s learning how to redraw them invisibly: with light, furniture, materials and circulation. In this article, we’ll see how to define functional zones in an open-plan space without rebuilding partitions – in a way that’s beautiful, practical and realistic in terms of budget and work.
Start with a plan, not with furniture
Before buying a sofa “that will go everywhere”, you need to understand how your open space actually lives. Take 30 minutes, a pencil and a tape measure.
Key questions to ask:
- Who uses this space, and when? Couple, family with young kids, teen household, télétravail… The zones won’t be the same.
- What are the 3 to 4 main functions? Usually: cooking, eating, relaxing, working, playing.
- What are the fixed constraints? Windows, radiators, load-bearing walls, existing plumbing, electrical feeds.
- Where do you enter? From the hallway? Directly into the living area? From a terrace?
Then, draw your room to scale (1:50 or 1:100 is enough) and block out zones with a highlighter: “kitchen”, “dining”, “lounge”, “desk/kids area”, etc. Don’t think furniture yet, think surfaces:
- Kitchen: minimum 7–10 m² if it includes an island and circulation.
- Dining: count at least 2 m x 3 m for a table + chairs + passage around.
- Lounge: allow a rectangle of 3 m x 3,5 m minimum for sofa + coffee table + TV zone.
Already at this stage, you’ll see if your dream 4-metre island + 8-person table + XXL corner sofa all in one line is realistic… or not. It’s easier to cross out on paper than to move a 300 kg table.
Use the floor to “draw” invisible borders
The floor is often the most efficient and least intrusive way to define zones without walls. Our eyes instinctively read a change of material as a change of space.
Option 1: Mix materials
- Tile or stone in the kitchen (easy maintenance, resistant to water and grease).
- Wood or laminate in the living/dining area (warmer, more acoustic comfort).
Where the two meet, you’ve created an invisible line. Not need for a partition: the flooring does the job.
Budget ballpark (France, supply only):
- Mid-range tiles: 30–60 €/m²
- Engineered wood: 45–90 €/m²
- Quality laminate: 25–50 €/m²
Points of attention:
- Plan the transition in advance: level difference, expansion joints, profiles.
- Avoid overly “busy” patterns everywhere: if the kitchen tile is strong, keep the living room calmer, or the opposite.
- If you already have a continuous floor you like, don’t destroy it just to mix: you can work with carpets (see below).
Option 2: Use area rugs strategically
Rugs are your best friends to create islands of function in an open space.
- Lounge: the rug should go under at least the front feet of the sofa and armchairs. This defines the conversation area.
- Dining: choose a rug on which chairs can slide back while remaining on the rug (count 60–70 cm extra around the table).
- Desk / kids’ area: a smaller, more resistant rug (flat-woven, easy to vacuum).
Costs (indicative):
- Large 200 x 300 cm rug: 150–500 € depending on material and brand.
For rental or tight budgets, this is one of the quickest ways to structure an open-plan without touching the building.
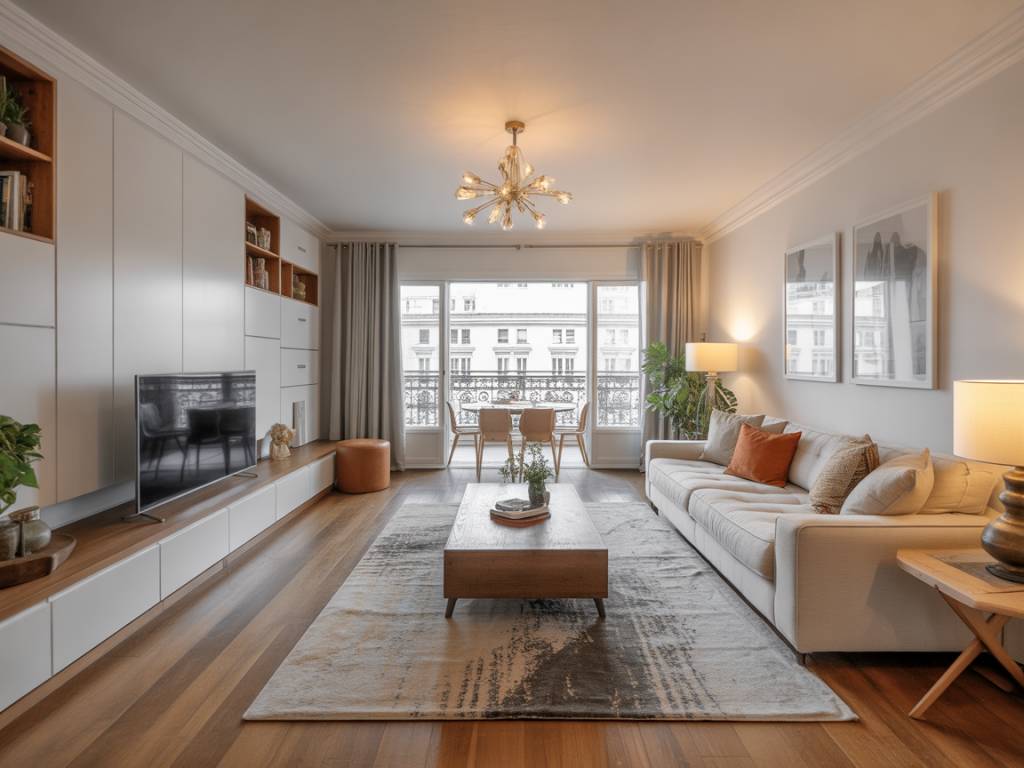
Furniture as soft partitions
In an open-concept layout, furniture placement is architectural. A sofa turned the wrong way, and your whole circulation falls apart.
1. The sofa as a low “wall”
Instead of pushing the sofa against the wall “to save space”, try placing it with its back towards the dining or entrance area. You immediately get:
- A clearly defined lounge zone.
- A soft separation when you enter the room (you don’t fall visually on the TV).
- A natural circulation around the sofa.
Choose a model with a nice back (no ugly technical fabric) if it’s visible. You can add a narrow console or bench behind to finish the “partition”.
2. Low storage units and consoles
Buffets, low bookcases and consoles at 70–90 cm height are very useful to cut spaces without blocking light or views.
- Between entrance and living room: a console + mirror defines a proper entry.
- Between dining and office area: a low bookcase for files and books makes a clear boundary.
DIY tip: two Ikea Besta units back-to-back with a custom wood top can create a solid, elegant “block” that structures the room for under 400 €.
3. Open shelving and bookcases
For a stronger separation without losing light, open shelving is a very effective tool:
- Metal or wood structure from floor to ceiling.
- Leave 30–50 % of empty space to let light pass.
- Use it for books, plants, storage boxes.
Budget estimates:
- Standard shelving units (Ikea, etc.): from 80–200 €/element.
- Made-to-measure metal and wood structure by a craftsperson: 800–2 500 € depending on dimensions.
Think long term: an open bookcase is dust-friendly and visually busy. Limit it near the kitchen if you hate cleaning.
Play with levels and ceiling treatments
If you’re ready for light building work, a change in height – even small – clearly defines a zone.
1. Platforms (raised floors)
Raising an area by 15–20 cm can visually detach it:
- Platform for a lounge or office corner.
- Built-in storage in the platform (drawers, trap doors).
Technical and budget notes:
- Check ceiling height: after the platform, you should still have 2,4 m minimum, ideally 2,5 m.
- Count 150–300 €/m² (structure + finishing), strongly depending on complexity and access.
- Think about accessibility: steps + children + elderly people = be prudent.
2. False ceilings and beams
Instead of raising the floor, you can lower the ceiling locally above a kitchen, dining area or hallway to visually zone:
- Plasterboard false ceiling with integrated lighting above the dining table.
- “Beam” effect (wood or metal cladding) between kitchen and living room.
Advantages:
- Allows you to integrate spots, LED strips, VMC ducts.
- Very clear visual separation when you pass from one zone to another.
Attention: don’t go below 2,2 m finished height under a false ceiling in main living spaces (check local building codes if in doubt).
Lighting: your most powerful zoning tool
A single big ceiling light in the middle of the room almost guarantees a “hall” effect. To structure an open-concept, you need layers of light attached to functions.
Think by zone:
- Kitchen: strong, functional lighting on the worktop (LED strips under cabinets, spots).
- Dining: pendant(s) above the table, at 75–90 cm from tabletop, dimmable if possible.
- Lounge: floor lamps and wall lights to create a more intimate atmosphere.
- Desk area: task light + possibly a wall light to visually pin the zone.
Each lighting group should be on a separate switch or circuit. This allows you to “turn on” only the zone you’re using, and the brain immediately understands where the focus is.
Indicative costs (excluding electrical labour):
- Good LED spots: 15–40 € / unit.
- Pendants: from 80–300 € for mid-range design brands.
- Floor lamps: 60–250 €.
If you’re renovating, plan the lighting layout at the same time as the furniture layout. Moving an electrical feed after painting is always more expensive than marking it correctly at the start.
Color and materials to tell the story of each zone
Color is a very efficient, low-cost way to define spaces without any physical element.
1. Accent walls by function
Rather than painting “a wall that was empty anyway”, use color where it will frame a function:
- Dark or strong color behind the TV / sofa area: it anchors the lounge.
- Warmer tone behind the dining area: creates a friendly focal point.
- More stimulating color (sage green, muted mustard) for a desk corner.
You can also paint zones on the ceiling (a rectangle above the dining table, for example) to visually “lower” and define the area.
2. Material palettes by zone
Keep a coherent base in the whole space (same floor, same white on ceilings, same baseboards), but differentiate via textures:
- Kitchen: more mineral (stone, tile, stainless steel).
- Lounge: textiles and wood (sofas, curtains, wooden coffee table).
- Desk: more structured, with shelves, cork board, metal lamp.
Tip: create a simple “material board” with 5–7 elements max (floor, wall paint, wood tone, metal finish, main textile) and stick to it. This avoids the patchwork effect that kills the clarity of zones.
Partial partitions: glass, slats, and flexible elements
You don’t want walls, but sometimes you need a bit more separation than furniture or rugs can offer: smells from the kitchen, view of the messy counter, TV noise… There are halfway solutions.
1. Glass partitions (type “atelier”)
Very popular for good reason: they let light through while acoustically separating and clearly marking spaces.
- Between kitchen and living room: full-height fixed glass with or without a door.
- Between office and lounge: half-height glass above a low solid panel.
Budget (very variable):
- Kit-style glass partition: 400–1 200 € depending on size.
- Made-to-measure with metalworker / carpenter: 900–3 000 €.
Think about cleaning (glass + cooking vapours = frequent maintenance) and safety (laminated glass mandatory in some configurations).
2. Wood or metal slats
Vertical slats (often wood) are an excellent compromise between open and closed:
- Create rhythm and depth.
- Filter views from the entrance or corridor.
- Can integrate storage or a bench at the base.
DIY level: intermediate. You’ll need a drill, level, good anchoring in the ceiling and floor, and accurate layout. Count roughly 150–400 € in materials for a medium-sized screen, more if you go custom.
3. Curtains and sliding panels
For very small budgets or rentals, textiles are a flexible solution:
- Thick curtain on a ceiling track to hide the kitchen when you’re not using it.
- Japanese-style sliding panels to define a desk corner.
Pros:
- Low cost (100–400 € with a proper track system).
- Reversible: you can open everything fully when you want a big open space.
Cons: less acoustic performance, need enough wall/ceiling space to fix the track.
Think circulation like a pro
A well-structured open-concept is one where you never feel you’re in the way. That means clean, logical circulation paths.
Basic rules to apply:
- Keep a main path of at least 90 cm wide from the entrance to the window / terrace / hallway.
- Do not force people to zigzag between chairs and sofa to reach the kitchen.
- Avoid placing a TV exactly in a natural circulation axis (people constantly cross the screen).
On your plan, draw with a colored pen the natural paths (entrance → kitchen, kitchen → table, table → sofa, sofa → terrace). If you constantly bump into furniture, rework the layout until the lines become smoother.
This may mean accepting that your sofa is 20 cm smaller than your dream model. But on a daily basis, fluency of movement will be worth infinitely more than the extra seat used twice a year.
Case study: from echoing hall to structured family space
Let’s take a typical situation from a renovation project: 38 m² open space in a 1980s house, originally three separate rooms. Owners knocked the walls down to “make it big”, ended up with:
- A huge 7 m long white rectangle.
- Kitchen in a corner, lost.
- Dining table stuck in the middle, floating.
- Sofa glued to the wall, TV on the opposite wall: “waiting room” effect.
What we implemented without rebuilding walls:
- Flooring: kept the existing parquet in good condition, added a large 200 x 300 cm rug under the lounge zone and a flat-woven rug under the dining table.
- Furniture layout: sofa placed back to the dining area, low console behind it, TV moved perpendicular to the length of the room to break the “tunnel” effect.
- Zoning by color: deep blue on the wall behind the sofa, warm greige around the dining, white kept in the kitchen to reflect light.
- Lighting: pendant above the table, floor lamp and wall light in the lounge, LED strip under kitchen cabinets.
- Soft partition: open metal and wood bookcase between entrance and lounge, 2 m wide, 2,2 m high.
Budget for this “restructuring without walls” (excluding kitchen furniture, already there): around 3 500 € (rugs, lamps, paint, console, custom bookcase). The perception of the space changed completely: same square metres, but now three clearly legible zones, more intimacy in the lounge, and a proper entrance instead of landing straight into the sofa.
Before you start: checklist
If you only keep one thing from this article, let it be this: define zones on paper before buying anything. Then validate every choice against these questions:
- Is the main circulation path clear and at least 90 cm wide?
- Can I name each zone in one word (cook / eat / relax / work)? If not, it’s probably too mixed.
- Do I use at least one of these tools per zone:
- Specific floor or rug
- Dedicated lighting
- Color / material focus
- Furniture acting as a soft partition
- Are my ceiling heights and structural constraints respected (no heavy platform or partition on a doubtful slab, no risky DIY on load-bearing elements)?
- Do I have a realistic budget for what I want (custom metal glass wall vs. simple curtain, etc.)?
Open-concept living works brilliantly when the space is legible: your eye understands immediately where to cook, where to sit, where to work. You don’t need walls for that. You need a little planning, some strategic choices of materials, a few well-placed lights and furniture, and a clear idea of how you want to live in your space – every day, not just in photos.