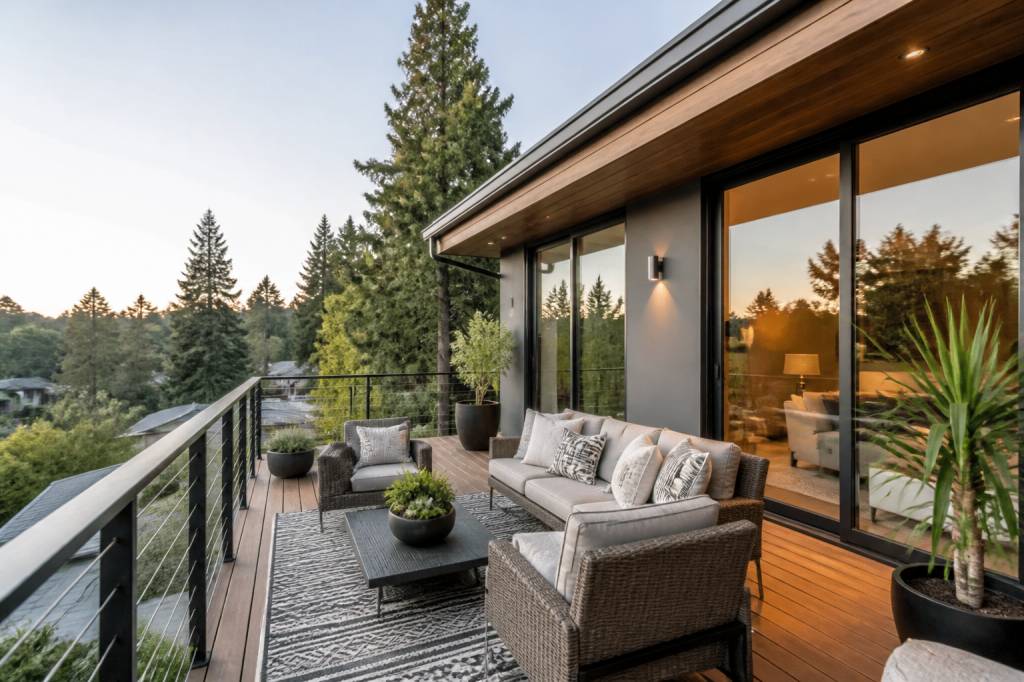
When an outdoor living room really fonctionne, you almost forget you’ve stepped outside. The floor flows, the sofa invites you to sit down, and the whole space feels like a natural prolongation of your interior – juste avec plus de lumière et d’air. That’s exactly what we’re aiming for here: not a “nice terrace”, but an extra room of the house.
In this guide, we’ll go through the key principles and the very concrete decisions that make the difference: level transitions, materials, protection from the elements, furniture choices, lighting, and budget ranges. The idea is that you finish this article capable of sketching a first layout and asking the right questions to your contractor or landscaper.
Start with the function, not the furniture
Before you fall in love with a designer outdoor sofa, be brutally clear about what this “room” will actually be used for. The best outdoor spaces are planned like interior floor plans.
Ask yourself:
- Is this primarily for everyday family life (kids, pets, quick breakfasts)?
- Is it more for entertaining (aperitivo area, long dinners with 8–10 guests)?
- Do you need a quiet corner to work or read outside?
- Will you cook outside regularly (full outdoor kitchen) or just use a portable barbecue a few times a month?
From there, define 1 or 2 main functions maximum. An outdoor living room that wants to do everything usually does nothing well. Typical combinations that work:
- Lounge + dining for larger terraces (20 m² and more)
- Lounge + compact cooking area for terraces directly off the kitchen
- Lounge only for smaller balconies or patios (under 12 m²)
Once the function is clear, you can dimension the space like an indoor room: circulation, furniture footprints, storage. This avoids the classic error of buying furniture first and discovering you can no longer open the sliding door.
Make the outside speak the same language as the inside
To feel like a true extension, your outdoor living room has to “continue” your interior design instead of competing with it. The goal is visual and material continuity.
Work on three key elements:
- Color palette: pick 2–3 main colors and 1 accent, ideally echoing your interior. If your living room has warm oak, off-white walls and black metal details, stay in that world outside: sand or light grey floor, black steel lanterns, cushions in off-white and terracotta.
- Materials: repeat at least one major interior material outside – it can be the floor tone, a wood species, a metal finish. For example, if you have oak flooring inside, choose a deck or outdoor tiles in a similar warm tone; if you have brushed brass inside, pick warm-toned metal outdoor lights instead of cold chrome.
- Lines and shapes: if your interior is very rectilinear and minimal, avoid overly rustic or curvy, ornate outdoor furniture. If your inside has rounded sofas and organic shapes, bring that softness outside with rounded coffee tables or curved benches.
Think of the two spaces as one large open-plan room briefly interrupted by glass. When you stand inside looking out, your eye should travel comfortably from the interior coffee table to the exterior one without a visual “shock”.
Sort out levels and thresholds first
Nothing kills the “extension” feeling faster than a 20 cm step down or a clumsy threshold that trips everyone up. If you’re still in the design phase, this is where you win or lose the battle.
Ideally, you want:
- Same finished floor height inside and out (or a minimal 2–3 cm difference for drainage and door frames).
- Flush threshold at the patio door: no big step, no rail to climb over.
- Continuity of floor formats: if you can’t use the exact same material, use a similar size and pattern for a smooth visual transition.
In renovation, this often means building a small raised deck to align with the interior. Anticipate:
- Drainage (slope away from the house, gutters, drainage mats).
- Regulations: in some countries, raising a terrace above a certain height triggers safety railing requirements or planning permissions.
- Accessibility: a flush transition is not only more beautiful, it’s also safer for children, elderly people and anyone with reduced mobility.
Budget ballpark: expect roughly €100–€200/m² for a simple timber deck built to align with interior level (labour + materials), more for composite or stone on pedestals.
Choose the right flooring for an “indoor” feel
Your outdoor floor is the visual extension of your interior flooring, but it also has to deal with rain, sun, stains and frost. The trick is to choose something technically suitable that still looks like it belongs to a living room.
Common options:
- Porcelain stoneware tiles (2 cm outdoor grade)
Pros: huge range of finishes (stone, concrete, even wood effect), non-porous, easy to clean, durable, works on pedestals for level adjustment.
Cons: can be slippery if you don’t choose the right anti-slip rating; requires good substrate preparation.
Look: great if you want a seamless effect with your interior tiles. - Timber decking (larch, exotic woods, thermo-treated)
Pros: warm, soft underfoot, visually very “living room”, easy to cut and adapt.
Cons: maintenance (oiling or greying gracefully), sensitivity to standing water, potential for splinters if not maintained.
Look: perfect for softening a very mineral interior. - Composite decking
Pros: low maintenance, stable tone, non-slip options, good for heavy-use family terraces.
Cons: can look artificial if you choose the cheapest versions, heats up more in full sun.
Look: clean, contemporary, practical. - Polished concrete or microtopping (on slab)
Pros: very contemporary, seamless, strong “loft” feeling.
Cons: requires excellent execution and proper expansion joints; can crack; not suitable everywhere in freezing climates.
Look: ideal to continue an interior concrete floor outside.
Whatever you choose, verify:
- Slip resistance rating adapted to a wet exterior area.
- Resistance to frost and UV.
- Compatibility with your existing substrate or planned deck structure.
Think in zones, like an open-plan interior
Instead of pushing all furniture against the façade and leaving an empty rectangle, treat your outdoor area like an open-plan living room. Create clear zones:
- Sofa/lounge area near the interior living room, to visually extend it.
- Dining area closer to the kitchen door for obvious practical reasons.
- Secondary corner (bench, reading chair, daybed) at the far end to “close” the perspective.
Allow for comfortable circulation:
- 80–100 cm minimum clear passage behind chairs and sofas.
- 90–120 cm in front of sliding doors so they open freely even with furniture nearby.
- At least 60 cm between edge of table and any wall or railing – 90 cm is ideal to pull chairs out easily.
Outdoor rugs, low planters and changes in lighting (a floor lamp for the lounge, a pendant or string lights above the table) help to subtly mark each zone, just as inside.
Protect from sun, rain… and neighbours
If you want your outdoor living room to be used more than ten days per year, you need a microclimate: shade, at least partial rain protection, and a bit of privacy.
Main options for the “roof”:
- Fixed pergola (wood or aluminium)
Budget: roughly €250–€600/m² supplied and installed, depending on material and finish.
Pros: durable, can integrate lighting and blinds; bioclimatic versions with adjustable slats manage sun and rain.
Cons: more expensive upfront, might require planning permission in some locations. - Retractable awning
Budget: €1,500–€4,000 for a quality motorised awning covering a 10–15 m² terrace.
Pros: flexible, retracts to let winter sun in, lower cost than a full pergola.
Cons: limited rain protection; fabric needs eventual replacement. - Shade sails
Budget: €300–€1,000 depending on size and quality, plus fixing posts if needed.
Pros: light, airy, visually interesting, relatively affordable.
Cons: less durable in strong winds; more limited rain protection unless you choose specific fabrics and slopes.
For privacy and wind, think in layers:
- Fixed elements: half-height walls, timber slat screens, glass windbreaks.
- Soft elements: planters with grasses, bamboo (in pots to control spread), climbing plants on a light structure.
- Movable elements: outdoor curtains on a pergola, folding screens, large parasols.
The idea is to filter views and wind, not build a bunker. You still want light and a sense of openness.
Choose furniture as if it were indoor, but built for outdoor
This is where most people either overspend on “statement” pieces that age poorly, or underspend on low-cost sets that ruin the whole look after one winter. Apply the same criteria you would for an indoor sofa: comfort, proportions, and quality of construction.
Key points:
- Structure: aluminium (rust-proof, light) or treated/grade A outdoor wood. Avoid basic steel frames near the sea or in very wet climates unless fully galvanized and powder-coated.
- Cushions: quick-dry foam, removable covers in UV- and water-resistant fabric (Sunbrella-type or equivalent). Check that covers can go in the washing machine.
- Depth & height: standard indoor sofa comfort applies: 90–100 cm depth for lounging; seat height 40–45 cm; table height 35–45 cm for a coffee table, 72–75 cm for a dining table.
- Flexibility: modular sofas and stacking chairs let you adapt to different uses and store in winter if needed.
Typical budgets for decent, not luxury, quality:
- Outdoor 3-seat sofa with cushions: €800–€2,000.
- Dining table for 6–8 people: €500–€1,500.
- Stackable dining chairs: €80–€250 each.
- Outdoor rug (polypropylene): €100–€400 depending on size.
Combine one or two quality “anchor” pieces (sofa, main table) with simpler, less expensive side tables and accessories. This is exactly how you would structure an indoor living room budget.
Layer lighting like in a real living room
If your terrace is only lit by one blinding wall fixture next to the door, it will never feel like an inviting room. Think in three layers, as indoors:
- Ambient lighting: soft, general light that allows you to move around without tripping – wall sconces on a dimmer, integrated LED strips in steps or under benches, indirect light on the façade.
- Task lighting: focused light where you need it – a pendant or string lights above the dining table, a directional light near the grill if you cook outside.
- Accent lighting: decorative light points – lanterns on the floor, candles, LED spotlights to highlight a plant or textured wall.
Practical tips:
- Plan outdoor electrical outlets and cable paths before finishing surfaces.
- Choose fixtures rated for exterior use (IP44 minimum, higher if directly exposed to rain).
- Use warm color temperature (2700–3000K) to match interior ambience and avoid the “car park” effect.
- Automate with timers or presence sensors for functional lights; control decorative ones with simple switches or connected plugs.
Textiles, plants and accessories: what makes it feel “finished”
Outdoor spaces often look cold because they’re missing the same elements we use indoors to soften a room. Without going overboard, a few well-chosen details completely change the perception.
- Outdoor rug: it visually anchors the seating area and bridges the mental gap between interior and exterior. Choose a size large enough for at least the front legs of the sofa and chairs to sit on it.
- Cushions & throws: mix textures (linen-effect, woven, structured fabric) in your chosen palette. Provide a storage box or bench so they don’t live permanently on the floor in bad weather.
- Planters: use fewer, larger containers rather than many small ones. Group them to create green “walls” and frame views instead of scattering pots randomly.
- Small tables: side tables are crucial – if no one has anywhere to put their glass or book, the space won’t be used for long.
- Fire element (where allowed): gas fire pit, bioethanol burner or even a well-designed brazier instantly brings a “living room” vibe. Always check local safety rules.
Plan storage and maintenance from day one
The least glamorous part, but the one that decides if your outdoor living room stays beautiful or turns into a sad corner of faded cushions and dirty tiles.
Think about:
- Where will cushions live in winter? Inside a nearby closet, in an exterior storage box, or in a dedicated bench with storage? Measure volumes realistically.
- How will you clean the floor? Is there a hose connection nearby? Is the surface easy to mop or brush? Avoid very textured tiles if you hate scrubbing.
- Wood maintenance: are you okay with a natural grey patina, or will you oil annually? Decide now and choose species and finishes accordingly.
- Covers: custom or semi-custom protective covers for sofas and tables significantly increase their lifespan. Budget for them from the start.
A good rule of thumb: if maintenance looks overwhelming on paper, you won’t do it. Adjust materials and the amount of textile accordingly.
Budgeting and phasing: how to tackle the project realistically
You don’t have to do everything at once to get a usable outdoor living room. But some elements are much harder to change later. Prioritise in this order:
- 1. Structure and levels: slab or deck, drainage, alignment with interior floor, railings if needed.
- 2. Protection: pergola/awning, privacy screens that require fixings, main electrical lines.
- 3. Floor finish: tiles, decking, concrete finish.
- 4. Core furniture: sofa, main table, chairs.
- 5. Lighting details: decorative fixtures, extra outlets.
- 6. Textiles and accessories: rug, cushions, planters, lanterns.
Very rough budget envelopes for a 20 m² terrace (excluding major structural works):
- Entry level / DIY-heavy: €3,000–€6,000 (simple deck or tiles, basic awning or sail, mid-range furniture, minimal lighting).
- Comfortable mid-range: €10,000–€20,000 (quality floor finish, aluminium pergola or good awning, durable furniture, layered lighting, custom screens).
- High-end: €25,000+ (bioclimatic pergola with automation, seamless interior/exterior floors, built-in benches and planters, outdoor kitchen, custom furniture, integrated sound and lighting).
Whatever your budget, invest first in the elements that are hard or expensive to modify later: structure, levels, weather protection and floor. Furniture and textiles can evolve over time.
Checklist before you start
To wrap up, a quick checklist you can literally copy into your project notebook:
- Defined 1–2 primary functions for the outdoor room (lounge, dining, cooking, work)?
- Checked level differences and possible solutions for a near-flush transition?
- Chosen a material palette that extends your interior (color, floor, metal/wood accents)?
- Validated exterior floor choice for slip resistance, frost and UV?
- Sketched circulation paths and furniture footprints with realistic dimensions?
- Planned sun and rain protection (type, orientation, fixing points)?
- Reserved space and budget for privacy and wind filtering (screens, planting)?
- Designed lighting with ambient, task and accent layers, and enough outlets?
- Anticipated storage for cushions and accessories + covers for furniture?
- Clarified maintenance level you’re willing to accept and chosen materials accordingly?
- Established a phased plan if budget doesn’t allow everything at once?
Once these boxes are ticked, you’re no longer improvising a “nice terrace”; you’re deliberately designing a real additional room – one that just happens to be outdoors.